Showing posts with label Clear Dollar Stamps. Show all posts

Thursday, May 10, 2012

ISSC15 - Beautiful Butterfly


Hi everyone! It's time for another iSpy Sketch Challenge and this week is a bit of a doozie...according to those who have a harder time with curved panels anyway ;) This week's challenge is ISSC15 is from Leanne W (From Leanne @ SCS) and is based on this card.


 Now here is what the sketch looks like and keep in mind that the circles can be any shape so I chose to use a butterfly from my Clear Dollar Stamps set called Beautiful Butterflies.

As you can see from the photo below, that I actually coloured up the butterfly twice and glued the pieces together on the body of the butterfly. I then bent up the top layer of wings to kind of make it like it's in flight :)


 The big curvy panel is completely sponged with various inks on water colour paper and the leaves have been created with the negative piece of paper from a die cut using the Sizzix Leaf Die. I love this technique with dies because you can create all kinds of beautiful backgrounds and the intense colours usually pack a punch :)

Thanks for joining me today and don't forget to see what some of the Special Agents have created for you this week. Don't be put off by the curvy panel ladies, because it's a fairly quick way to make a card and it adds such a unique layer to your cards :D


Card Recipe:

Stamps: Clear Dollar Stamps - Beautiful Butterflies
Paper: Gina K, Black, Water Colour, My Mind's Eye
Ink: Versafine Onyx Black, Baja, Bermuda Bay, Kiwi, Olive, Artichoke, Burgundy, Razzleberry, Eggplant
Accessories: Sewing Machine, Cuttlebug and Embossing Folders, Clear Embossing Powder, Tombows, Water Brush, Chalk Pencil, Ribbon, Leaf Stick Pins, Sizzix Leaf Die, Drafting Bendable Ruler, Sponges, Dimensionals

Thursday, February 16, 2012

ISSC03 - Pot of Love


Hi everybody! As the post is going live, I'm currently traveling down to Seattle to take part in an annual pajama crop with this group of special ladies:
Angela, Tobi, Laurel and myself will be driving down on Thursday and will be coming back most likely changed people after the event! I'm telling you that some of these ladies are crazy! But I know that we are in for a boatload of fun and some perma-grin :D


...And now back to your regular programming :D This is the card that I made to feature one of Sean Fetterman's cards for the ISSC03 challenge at the iSpy Sketches blog. I used and oldie but a goodie stamp from Clear Dollar Stamps called Bless my Bloomers which was a set that I illustrated :D I watercoloured it with tombows, shaded it with chalks, coloured the grass with prismas and then sponged it with inks :D


I have to admit that I did struggle with the sketch a bit simply because the images that I wanted to colour up for the card were all too big. In the end, I love how the card turned out! If you would like to join along in the challenge, please visit me and the rest of the Special Agents over at the iSpy Sketches Challenge blog :) Hope to see you there!

PS: What do you think of the facelift here at Paper in the Works? I have been flu ridden this past week so I decided to play around and came up with this design in between coughing, sneezing, and whining ;)

Card Recipe:

Stamps: Clear Dollar Stamps - Bless my Bloomers
Paper: Gina K, Water Colour, Espresso, Misc Designer Papers
Ink: Versafine Onyx Black, Mustard, Banana, Caramel, Suede
Accessories: Cuttlebug and Embossing Folders, Clear Embossing Powder, Spellbinders, Brads, Mat Pack, MS Heart Punch, Chalks, Tombow Dual Brush Pens, Water Brush, Prisma's and Gamsol, Corner Chomper, Sponges, Sewing Machine, Ribbon

Monday, November 15, 2010

CDS - Unity Candle Digital Image


Welcome to my first digital image release through Clear Dollar Stamps! This image is called Unity Candle and is mostly an Anniversary set but has been designed to work well with The Light of Winter stamp set from the November release :0)

The image was water coloured with Derwent Inktense pencils and a water brush on Canson 90lb cold press paper. After I finished colouring the image I gave it a thick coat of crystal effects to make the image glossy and to give it a little extra "oomph" since I didn't make the image 3D.

I was able to find some scraps that worked well with this image and came up with a rather strange layout - but I kind of like it ;) I kept the embellishments to a minimum because I made this card for my honey and, well...he's a guy and doesn't appreciate all that much bling ;)

Although this is my first digital set...sadly, this is my last official post as a Design Team Member/ Illustrator for Clear Dollar Stamps. I came to the decision in September to leave the team and to take a break from illustrating. I have thoroughly enjoyed working with Lori McCroskey and her Clear Dollar Stamps girls and am going to miss them immensely! For those of you who don't know, Lori was the first design team that I ever worked with and I have been with them since June of 2008 :) She not only believed in me and gave me my big break as a designer/illustrator but also along the way became a good friend and I am so very thankful for those opportunities!

Thanks for coming by today and don't forget to take a peek over at Lori's blot to see at all of the Digital Release Images that are available as of today!


Card Recipe:

Stamps: Unity Candle Digital Image
Paper: Gina K, Chocolate, Water Colour, My Mind's Eye DP
Ink: Printer, Caramel, Chocolate
Accessories: Sewing Machine, Cuttlebug and Embossing Folders, Spellbinders Labels Dies, Derwent Inktense Pencils, Water Brush, Ribbon, Sponges, Crystal Effects, Printer

Wednesday, November 3, 2010

SC305 - Joy


Do you ever get excited to do some stamping and then surf around for some inspiration to get you kick started? I do, and I came across this week's sketch challenge over at SCS (SC305). I did get a chance to participate but this card didn't come together as easily as I had hoped.


I sat down and picked out my papers and then just ended up staring at them. *Poof* Just like that - all my inspiration and energy went down the drain. I decided to water colour the candle (Clear Dollar Stamps - The Light of Winter Set) up with my tombows anyway and then cut out all of the shapes. I then left the room for at least a half hour so that I could come back to my would be card with some new ideas and hopefully a colour combo for the sponging behind the candle.

It was one of those nights where I just couldn't make up my mind, so instead I just ended up pulling a bunch of inks out of my ink carousel and started adding them and hoping for the best. It ended up turning out fairly decent but now that I look at the card, I probably would have gone with yellows, greens and browns for the ink colours. Oh well. It's finished and I'm not going back and changing it! lol


Speaking of Sponging Ink...Did you all know that I teach a Sponged Ink Backgrounds class over at My Creative Classroom? I know that at the top of my blog, there is already a reminder but I thought that I would include a little blurb about it in this post so that all of my email subscribers would have the info as well.

The class starts on November 3rd and will run as online classes for 4 weeks in total. Online classes are perfect for all of you who like to craft in your jammies ;) This class is ideal for beginners and advanced card makers and will bring a new vibrancy to your card making skills. Won't you come out and join me in getting inky?

Card Recipe:

Stamps: Clear Dollar Stamps - The Light Of Winter
Paper: Gina K, Black, Water Colour, Fancy Pants, SU
Ink: Versafine Onyx Black, Saffron, Chocolate, Red, Pumpkin, Mustard
Accessories: Sewing Machine, Sponges, Dimensionals, Clear Embossing Powder, Cuttlebug and Embossing Folders, Circle Punches, Brads, Versa Marker

Friday, October 29, 2010

The Light of Winter


 It's sneak peek time at Clear Dollar Stamps and today I have one of my own brand new sets to share with you. Be prepared as there are 2 cards to share in this post - aren't you lucky? :0)

The set that I'm showing is called The Light of Winter and you can see the entire set at the Clearly iStamp blog. The set is a just a little set of 5 stamps and will sell for $4.99 but it has multiple uses and there is also a separate coordinating sentiment "Let God's light shine".


For this card I chose to water colour it with tombows and then pop it up to be 3 dimensional. I paired the image up with the Peaceful Wishes sentiment and holly image to make it a Christmas Card and dressed it with some gorgeous ribbon and elegant colours.


For my second card, I chose to keep it a little more simple. The candle has been water coloured and then I masked off the area and sponged the background in. I left a wide margin of white water colour paper and then added the panel to a simple embossed designer paper background. This card came together fairly quickly and the hardest part was not getting any ink smears on my white border from my inky fingers ;)

I did the two cards a little differently to show the versatility of the set. The first one was a Christmas card and the second one was more of a "thinking of you" or "thank you" card for the winter months.

Thanks for coming by today and this stamp set will be released for sale on November 1st. Don't forget to pop by the blogs below to see what the talented CDS girls have been up to :D


 Peaceful Wishes Card Recipe:

Stamps: Clear Dollar Stamps - The Light of Winter
Paper: Gina K, Water Colour, Chocolate, K&Co DP, My Mind's Eye DP, Basic Grey Dp
Ink: Versafine Onyx Black, Chocolate, Baja, Caramel
Accessories: Sewing Machine, Cuttlebug and Embossing Folders, Spellbinders Labels Dies, Clear Embossing Powder, Ribbon, Tombow Markers, Water Brush, MFT Jumbo Scallop Die, Corner Chomper, Sponges, Dimensionals, Gelly Roll Glitter Pen, Crystal Effects

Warm Winter Months Card Recipe:

Stamps: Clear Dollar Stamps - The Light of Winter
Paper: Gina K, Water Colour, Black, My Mind's Eye DP
Ink: Versafine Onyx Black, Saffron, Mustard, Plum, Eggplant, Caramel, Chocolate
Accessories: Sewing Machine, Sponges, Clear Embossing Powder, Artist Masking Tape, Paper Piercing Tool, Cuttlebug and Embossing Folders,

Sunday, October 10, 2010

Mojo159 - Happy Holidays


Hey everyone! I'm here today with a super quick post with my Mojo159 card that features my Filled with Cheer set from Clear Dollar Stamps.

I used the holly and the sentiment from the set and water coloured it with my tombows. I sponged and embossed around all of the layers of the Basic Grey Wassail papers and added some soft sponging around the holly as well. I finished off the card with some luxurious taffeta ribbon and some mini adhesive backed pearls and this card could be easily mass produced for Christmas :)

Thanks for coming by tonight and stay tuned for a boatload of card postings that will be coming your way all this week. To all of my fellow Canadian friends I wish you all a very happy turkey bird eating day (aka - Thanksgiving) and save some pumpkin pie for me :D

Card Recipe:

Stamps: Clear Dollar Stamps - Filled with Cheer
Paper: Gina K, Chocolate, Water Colour, Basic Grey Wassail
Ink: Versafine Onyx Black, Caramel, Chocolate
Accessories: Sewing Machine, Cuttlebug and Embossing Folders, Spellbinder's Dies, Mini Pearls, Ribbon (CDStamps), Clear Embossing Powder, Corner Chomper, Pop Dots, Sponges, Tombow Markers, Water Brush

Wednesday, September 29, 2010

The Man Card


If this isn't a man card then I don't know what is :) Notice that I didn't say "masculine" card? The reason is simple..."masculine" somewhat implies some refined and rugged qualities with a little musk on the side. A "man" card represents the other half of the spectrum...lover of all sports, couch potato like, the need to be the king of all things electronic with a little Au de Beer Toilette on the side ;) I guess that you can say that my man *might* be considered the type to receive a card such as this, after all...he was the one that came up with the idea for this set ;)

I made this card with one of my newer illustrations called The Measure of a Man from Clear Dollar Stamps and got a chance to participate in this weeks SC300 challenge over at Splitcoaststampers. Since it's the 300th birthday of the Sketch Challenge, they are having a little par-tay. You should swing on by and check it out :D

I water coloured the remote with my Tombow Markers and then simply cut it out and keeping some white trim around it so that it would really stand out against the dark grey designer paper. I grabbed a bunch of scraps from my bin to put together the papers and kept my fingers crossed that they would match my already coloured image. Tsk, tsk...I know ;)

Pssssssst! Did you hear? Lori has some exciting new things to show you on her blog today that she has been working really hard on. I won't spoil the news, so your just going to have to hop right on over and take a peek for yourself at the Clearly iStamp blog :D

Thanks for coming by today!

Card Recipe:
Stamps: Clear Dollar Stamps - The Measure of a Man
Paper: Gina K, Water Colour, Black, Basic Grey DP, October Afternoon DP
Ink: Versafine Onyx Black, Ranger Distress Antique Linen, Chocolate
Accessories: Sewing Machine, Cuttlebug and Embossing Folders, Tombow Markers, Water Brush, Clear Embossing Powder, Ribbon

Tuesday, September 28, 2010

Filled with Cheer at Christmas


Welcome back to day 2 of the Clear Dollar Stamps sneak peeks. Today I have my newest illustration to show called Filled with Cheer and it has endless possibilities for all of those Christmas cards that need to be made! To see a peek at the entire set, please visit the Clearly iStamp Blog.

I have 2 cards to show you today and the first one up is a clean and simple card using non traditional colours :) If you have been reading my blog lately, you know that I have been trying my hand at clean and simple cards (I do mean trying, but not always succeeding! lol) This card is truly clean and simple for me. There is no sponging, paper tole, extra baubles of any sort and the layout is simple. I have to say that I adore this card! It turned out exactly like I had hoped and it didn't leave me with the feeling that I left something out or the need to pull my hand away from the embellishments just to fill up some space ;)

This is the first image that I tried my Derwent Inktense pencils and water brush on and I think that it turned out pretty well. I currently only own a set of 12 so this was and experiment on mixing the colours together to get the shades that I wanted and this would be why my colours ended up non traditional ;) I still have to work at my mixology! lol

Card Recipe:

Stamps: Clear Dollar Stamps - Filled with Cheer
Paper: Gina K, Water Colour, Chocolate, My Mind's Eye DP, Cosmo Cricket DP
Ink: Versafine Onyx Black
Accessories: Sewing Machine, Ribbon, Derwent Inktense Pencils, Water Brush, Stickles, Clear Embossing Powder


The second card is paper toled and paper pieced with some coordinating card stock. For this card I used my beloved Tombow Markers and a water brush to colour most of the image and then used some sponging to add some shading to that paper piecing. I used the candy filling to stuff this stocking but there is also the option of using a sleeping mouse, presents and toy fillers too :) This set is very versatile!

Don't forget to visit all the DT blogs today as there are lots of fun sets being previewed. Thanks for coming by today and this set will be available on October 1st.

Card Recipe:

Stamps: Clear Dollar Stamps - Filled with Cheer
Paper: Gina K, Black, Water Colour, My Mind's Eye DP, Basic Grey DP
Inks: Versafine Onyx Black, Caramel, Chocolate, Mustard
Accessories: Sewing Machine, Cuttlebug and Embossing Folders, Oval Nestabilities, Ribbon, Button, Linen Thread, Sponges, Pop Dots, Clear Embossing Powder, Tombow Markers and Water Brush, Corner Rounder

Saturday, September 11, 2010

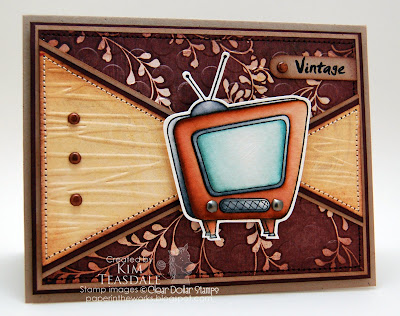
FS188 - Vintage TV


I just realized tonight that I have neglected my blog in order to work ahead at some of the things that I will be showing here next week...so I put everything down and started this card :) I got a chance to participate in the SCS Featured Stamper Challenge FS188 and Die Cut Diva was being featured this week. This is the card that I chose as my inspiration.

By the Featured Stamper rules, I had to change three things to the card that I was CASE'ing, so I added some sewing, designer papers and brads instead of eyelets. I also switched up the image to the retro television from my latest release over at CDStamps called The Measure of a Man.

The TV was actually water coloured with re-inkers for a change and I didn't do any tole work. I wanted to keep with the clean look in the spirit of so many of Terri's cards. I added some pewter brads as the knobs on the TV and left a white outline of water colour paper so that my TV would stand out from the rest of the dark colours on the card.

Thanks for coming by and be sure to pop in on Monday to see some of the things that I have been working on :)

Card Recipe:

Stamps: Clear Dollar Stamps - The Measure of a Man
Paper: Kraft, Chocolate, Water Colour, Cosmo Cricket Dp, Basic Grey Dp
Ink: Versafine Onyx Black, Chocolate, Caramel, Baja, Sky, Sand, Grey
Accessories: Sewing Machine, Cuttlebug and Embossing Folders, WW Punch, Brads, Sponges, Pop Dots, Clear Embossing Powder

Monday, August 30, 2010

CDS Sneak Peek - The Measure of A Man


Recognize this shaker card? This little card was made for my debut as a Dirty Dozen member for the March 2009 gallery - TV Dinners and was the complete inspiration for my newest Clear Dollar Stamps illustrated set called "The measure of a man". This set will be released on September 1st.


The set was a collaboration of both me for the images and my wonderful husband who thought up the sentiments...and you can quote him on those! lol This set has such sentiments as "He who dies with the most remotes, wins", "Definition of multi-tasking: picture in picture", "A man's self worth is measured by the size of his t.v" and "Vintage never goes out of style" with coordinating sentiments of "Happy birthday" and "Enjoy your day". I have been told by Bill that this set will be a best seller because the sentiments are perfect for any man! Cheeky, isn't he? LOL


To see a peek of this set in it's full form, please hop on over to the Clearly iStamp blog to see this and the other sets that are being previewed today and also don't forget to visit all the the very talented ladies that are showing off all of their lovely samples for you today:


Christi Bryant

Michelle Sampson

Barb Gmitro Best


Before I go I would love to wish my big brother a very Happy 34th Birthday! Age is just a number and thankfully it's a whole year older than my number! *snicker*


TV Card Recipe:

Stamps: Clear Dollar Stamps - The Measure of a Man
Paper: Gina K, Black, Water Colour, My Mind's Eye DP, Upsy Daisy DP
Ink: Versafine Onyx Black, Antique Linen, Cocoa
Accessories: Sewing Machine, Cuttlebug and Embossing Folders, Spellbinders Circle and Labels Nestabilities, Clear Embossing Powder, Tombow Markers, Water Brush, Sponges, Pop Dots, Crystal Effects, Brads, Corner Rounder

Radio Card Recipe:

Stamps: Clear Dollar Stamps - The Measure of a Man
Paper: Gina K, Black, Water Colour, Basic Grey DP
Ink: Versafine Onyx Black, Antique Linen, Cocoa, Baja
Accessories: Sewing Machine, Cuttlebug and Embossing Folders, Spellbinders Circle Nestabilities, Top Note Die, Clear Embossing Powder, Tombow Markers, Water Brush, Sponges, Pop Dots, Brads, Ribbon, Twill Tape

post signature

Friday, July 30, 2010

CDS Sneak Peek - Welcome Little One


Today, I have a baby boy card to show you and while doing so I get to introduce you to a new set called Welcome Little One by Clear Dollar Stamps that I illustrated :) This set has some sweet sentiments in it, a teddy bear, baby carriage, baby blocks and a stork image. To see this set fully, please visit the Clearly iStamp blog.


I picked out the teddy image to feature today, and made it a slightly more boyish card by adding the blue but kept a more vintage feel to the card with a lot of subtle sponging and more traditional patterns. The bear was water coloured and then popped up on a sponged and prisma pencil background. I added some cross stitching to the left side of this 4x6" card but accidentally covered some of it up because I made the yellow panel a bit too long...but it was already put together and sewn so I used it anyway...so pretend you didn't notice my boo boo, 'kay? :D

I used some of the tropical mist ribbon from the Clearly Coordinating Collection to fasten my button to and hand the little die cut tag from. I love how this ribbon was able to coordinate so well with my basic grey papers :D

Thanks for swinging by today and don't forget about all of the other fabulous sets that the girls are showing off today! Have fun blog hopping :D

Christi Bryant

Michelle Sampson

Barb Gmitro Best


Card Recipe:

Stamps: Clear Dollar Stamps - Welcome Little One
Paper: Gina K, Caramel, Water Colour, Basic Grey DP
Ink: Tombow Markers, Baja, Ranger Distress Antique Linen, Versafine Onyx Black
Accessories: Sewing Machine, Cuttlebug and Embossing Folders, Spellbinders Dies, Button, Linen Thread, Piercing Tool, Water Brush, Sponges, Corner Rounder, Pop Dots, Scallop Edge Punch, Prisma Pencils and Gamsol

post signature

Saturday, July 24, 2010

DTGD - Challenges R Us


Well, it's official. The Dare to get Dirty challenges for this year have finished up but you still have until August 1st to upload your images for a chance to win prizes :D I didn't get a chance to participate much during the week of the challenges so I thought that I would make it up all with these two cards!

Are you ready for the list? Yes? Ok, then...you asked for it ;) This sweet little cuttlekids monkey qualifies for these challenges:

DTGD10notimetostamp, DTGD10DebDeb, DTGD10AmberDawn, DTGD10SuzanneJDean (Planet of the Apes)


And...this adorable butterfly card qualifies for all of these challenges:

DTGD10CraftyCaro, DTGD10DeborahLynneS, DTGD10Flowergal36, DTGD10notimetostamp, DTGD10DebDeb, DTGD10AmberDawn, DTGD10SuzanneJDean (The Butterfly Effect)

See! I was making up for lost time ;) This collection of challenges came about when I was assembling designer papers and went to my master list of challenges to get ready to make these kid's birthday cards. I circled a pile of challenges off the list and went to town to create these very simple, yet cute cards.

My kids have a birthday party to go to tomorrow (the butterfly card) and then the monkey card is for my nephew's 3rd birthday. His mom and dad call him a little monkey so I thought that it would be kind of fitting :D

Hope that you enjoyed looking at these and I can't tell you enough how handy theses cuttlekids dies are when you have some kid's birthday cards to crank out! lol

Card Recipe:

Stamps: Clear Dollar Stamps - Hanging Out
Paper: Gina K, Black, Water Colour, Grey, Saffron, Caramel, Ivory, Olive, Assorted Scrap Designer Papers
Ink: Versafine Onyx Black, Melon, Saffron, Mustard, Grey, Chocolate, Caramel
Accessories: Sewing Machine, Cuttebug, Embossing Folders, Cuttlekids Dies, Spellbinders Dies, Dew Drops, Sizzix Leaf Die, Sponges, Pop Dots, Stickles, Brads, Corner Rounder Punch

post signature

Saturday, July 17, 2010

DTGDblondie090277 Sketch


Hi ladies! I'm so excited to be bringing you this card today for the official start of the Dare To Get Dirty 2010 Challenges! If you have never heard of this before then let me give you a little run down. The DTGD Challenges are an annual event put on by the Splitcoaststampers Dirty Dozen and Alumni Team as a thank you to all of the Fan Club members. This year it's an entire week of challenges with roughly 5 challenges per day. You will have until August 1st to upload these to enter for some prizes. See this thread for more details.

This particular card was made up for the challenge that I'm hosting (DTGD10blondie090277) and I had some fantastic sample makers to help me out! Be sure to check out my challenge if you are a fan club member. If not...what are you waiting for ;D


I pulled out one of my older sets called Subs, Sails and Tugs to create this whimsical ocean themed card. I have been drawn to bold colours lately and this is no exception! I broke out my new October Afternoon Fly a Kite papers and dragged out my scrap bin for this fun card. The ship has been water coloured and then popped up in a paper "port hole" frame. I studded this with mini brads from Clear Dollar Stamps and added a coordinating shell button.

I had so much fun making this card! I will be back in a few days to show you a sample that I make for another challenge that will be coming up. Until then, be sure to pop by and partake in some of the fun that will be happening all this week over at SCS :D


Card Recipe:


Stamps: Clear Dollar Stamps - Subs, Sails and Tugs
Paper: Gina K, Black, Grey, Water Colour, Scenic Route DP, October Afternoon DP, Basic Grey DP
Ink: Versafine Onyx Black, Teal, Baja, Pumpkin, Navy
Accessories: Sewing Machine, Cuttlebug and Embossing Folders, Spellbinders Circle Dies, Cloud Stencil, Mini Brads (CDStamps) Hodgepodge Hardware, Shell Button, Clear Embossing Powder, Sponges, Pop Dots, Tombow Markers and Water Brush, Corner Rounder, Scallop Edge Punch, Mat Pack and Piercing Tool, Linen Thread

post signature

Wednesday, June 30, 2010

CDS Sneak Peek - Picnic Time!


Yippee! It's sneak peek time for Clear Dollar Stamps and I have this cutie to kick off the summer season with. This set is called Picnic Time and is one of my own, and you can see the entire set over at the Clearly iStamp blog.


For this card I masked the skunk to fit into the picnic basket because clearly, he wanted to join the party too, and added a scrap of October Afternoon DP as a table cloth. The background was made up of strips of sponged card stock that I weaved together to mimic the basket. I water coloured the image with my tombows and popped up a few sections to make it more dimensional. I have to admit...I did have a hard time leaving lot's of "white space" and tearing myself away from all of the yummy designer papers that I had picked out for this card!

Thanks for coming by this neck of the woods today and don't forget to hop around and check out all the other sets that are being previewed :)


Card Recipe:

Stamps: Clear Dollar Stamps - Picnic Time
Paper: Gina K, Black, Water Colour, Mustard, October Afternoon Farm Fresh DP
Ink: Versafine Onyx Black, Cocoa, Baja, Navy, Sand
Accessories: Sewing Machine, Cuttlebug and Embossing Folders, Sponges, Dimensionals, Brads, Clear Embossing Powder, Tombow Markers and Waterbrush

post signature

Sunday, May 30, 2010

CDS Sneak Peek - Medallion de Fleur


Oh good! I'm so glad that you are joining me again for the second card of the day for the Clear Dollar Stamps sneak peeks :) This gorgeous background stamp is called the Medallion de Fleur and will be available on June 1st. For a larger peek of the stamp, please pop by the Clearly iStamp blog :)


When I first saw this stamp, I immediately thought of how feminine it looked and it begged to be embossed in white on white vellum. I adore how elegant this technique looks and I'm pretty sure that it was made for stamps like the Medallion de Fleur ;) This stamping technique looks particularly stunning on anything to do with weddings!

Since I was already working with the vellum, I decided to take it one step further and create the flower and leaves out of the same materials. I simply sponged some inks on a piece of vellum and then punched and die cut the shapes out. I think that it adds just the right touch of softness to the card :)

Clear Dollar Stamps has also recently introduced their own cardstock, ribbon, copic and tombow line called the Clearly Coordinating Collection. For my samples this month I used some card stocks from the soon to be released (June 1st) Rustic Fall line called Ripe Olive. I thought that it was such a pretty colour and if you take a close look at my card, I not only used it as a matting but also to add a change of colour behind the medallion embossed vellum and tied it all together with some of the Ripe Olive ribbon :)

Thanks for coming by again and here is a list of more CDS goodness for you to drool over ;)

Card Recipe:

Stamps: Clear Dollar Stamps - Medallion de Fleur
Paper: Gina K, Ripe Olive, Velllum, Basic Grey DP
Ink: Regal Rose, Versa Mark, Old Olive
Accessories: Sewing Machine, Cuttlebug, Spellbinders Scallop Circle Dies, Scallop Circle Punch, Sizzix Leaf Die, Ripe Olive Ribbon, Scallop Edge Punch, Brad, Cuttlebug Embossing Folders, Sponges, Pop Dots, Boho Blossom Punch, White Embossing Powder

post signature

CDS Sneak Peek - Scripture Children


Welcome back to another day of the Clear Dollar Stamps sneak peeks :) Today I actually have 2 sets to preview, so pop back in here later for the Medallion de Fleur sample. This gorgeous children silhouettes are from a brand spankin' new set called Scripture Children that will be released on June 1st. For a complete view of the set, pop on by the Clearly iStamp blog.


This card came together with such an unusual colour combo because I pulled the colours out of the already made sunset sponged background that I had left over from teaching my sponging class over at MCC. I was able to just trim the scene down using a nestability, re-sponge the edges and then add my stamped/embossed cut out children silhouettes. I then attacked my scrap bin looking for something that would match...and well...this was the final product ;)

Thanks for coming by today and remember to check back in a little later for my Medallion de Fleur sample. Until then, there are so many more gorgeous cards for your viewing pleasure, just click the links below and leave a little love along the way :)


Card Recipe:

Stamps: Clear Dollar Stamps - Scripture Children
Paper: Gina K, Basic Black, Water Colour, Scraps of Misc. Papers
Ink: Versafine Onyx Black, Not Quite Navy, Banana, Pumpkin, Mustard, Cocoa
Accessories: Sewing Machine, Cuttlebug and Embossing Folders, Spellbinders Dies, Powder Puff Ribbon, Sponges, Clear Embossing Powder

post signature

Saturday, May 29, 2010

CDS Sneak Peek - Pansy Bunny


Let the sneak peeks begin! It's that time again over at Clear Dollar Stamps and today I'm introducing you to Trudy's newest set called Pansy Bunny - isn't he adorable? This little fellow has been water coloured with my tombow markers and a water brush and then made to be 3-D with oodles of pop dots in between. I {heart} pop dots ;)


I paired this cutie up with plethora of scraps that I had laying around and used some of the Clearly Coordinating Collection's newest addition of the Rustic Fall line. I used one of the browns called Mud Pie. If you haven't already been introduced to the CDStamps paper, ribbon, copic and tombow matching collections then you are missing out! Pure genius I tell you ;)

Thanks for coming by today and I will be back in a couple of days with another couple of cards to show you :) Don't forget to mosey on over to all of the CDS DT blogs to see what the girls have been up too - there are plenty of sneak peeks to been peeked upon today ;)


Card Recipe:

Stamps: Clear Dollar Stamps - Pansy Bunny
Paper: Gina K, Mud Pie, Water Colour, My Mind's Eye DP, Basic Grey DP, K&Co DP
Ink: Versafine Onyx Black, Mustard, Olive, Pumpkin, Tombow Markers
Accessories: Sewing Machine, Cuttlebug and Embossing Folders, Clear Embossing Powder, Spellbinders Dies, Eyelets, Dewdrops, Sponges, Pop Dots, Water Brush, Corner Rounder, Tombow Markers

post signature

Sunday, May 16, 2010

A Snake for Jake


I just thought that I would pop in today and share a fun card that I made for a birthday party that my son went to today. I used one of the cuttlekids dies that I bought for my munchkins and put together this silly snake card in under an hour (that's record time for me! lol). The race was on this morning when I realized that I hadn't made a card to attach to the present yet - yikes!


If you haven't tried these cute little dies yet then you don't know what your missing especially if you have little ones around! I just think that they are so adorable and are certainly a life saver when you are in need of a quick kids card :) I may or may not have purchased almost all of the cuttlekids animals available when I found them on sale...but I'm not sayin' for sure ;)

Anyway, I hope that you liked my quickie card for the day and I'm off to see if there is an inner Julia Child's in me...it's dinner time baby! :)


Card Recipe:

Stamps: Clear Dollar Stamps - Monster Mash (sentiment)
Paper: Gina K, Black, Water Colour, October Afternoon DP, SU DP, My Mind's Eye DP
Ink: Versafine Onyx Black, Olive, Baja, Not Quite Navy
Accessories: Sewing Machine, Cuttlebug Embossing Folders, Cuttlekids Snake Die, Pop Dots, Sponges, Small Oval Punch, Corner Rounder, Brads, Ribbon

post signature